Below you will find what the program Jellyfish V.3.00 (level 7, using the
bear off database) regards as the top 4 plays of each position. I have not had chance to roll them out personally
but I have made the positions available for you on my download page should you be inclined.
If you have forgotten what your original answer was, then simply use
your browsers back button to have a quick look.
![]() or scroll down for the first position
or scroll down for the first position
1) 5 point match, Blue leads 2:0, Pip count: Blue 86 / White 175.
Blue to play 5-4?

|
Move |
Rkg. |
Equity |
Eq. Dif. |
| (a) 13/4 |
2. |
0.974 |
0.017 |
| (b) 11/6 5/1 |
4. |
0.910 |
0.081 |
| (c) 11/6 13/9 |
1. |
0.991 |
0.000 |
| (d) 13/8 13/9 |
3. |
0.922 |
0.069 |
This is a pay now or pay later situation. White has no Home board to speak of, but
will improve it within the next few rolls. The resulting position of 11/6 13/9 looks loose but as White has no
board it makes sense to start moving closer to home now while the going is good. ![]()
![]()
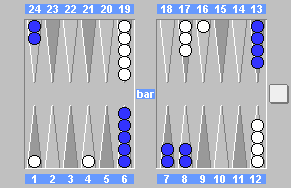
2) 5 point match, Match is even 0:0, Pipcount: Blue 160 / White 160.
Blue to play 3-1?
|
Move |
Rkg. |
Equity |
Eq. Dif. |
| (a) 24/21 6/5 |
4. |
-0.050 |
0.119 |
| (b) 24/20 |
2. |
0.000 |
0.069 |
| (c) 24/21 24/23 |
3. |
-0.023 |
0.092 |
| (d) 8/5 6/5 |
1. |
0.069 |
0.000 |
Moving a checker from the 24 point 3 or 4 pips results in White being in an attacking
position against the advanced blot when it is not at this stage necessary. Blue has an opportunity to make his
5 point early in the game and should do so now. The blot left on the 8 point, if hit, will set Blue back in the
race but Blues overall position would be stronger than whites offsetting the pip loss. If white misses the blot
on the 8 point and Blue covers then Blue is a favorite to win.
![]()
![]()
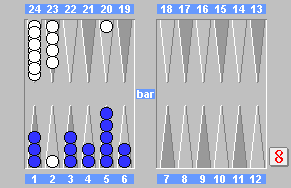
3) 5 point match, Match is even 0:0, Pipcount: Blue 57 / White 45.
Blue to play 4-2?
|
Move |
Rkg. | Equity | Eq. Dif. |
| (a) 5/1 5/3 |
4. |
0.466 |
0.088 |
| (b) 6/2* 2/off |
1. |
0.554 |
0.000 |
| (c) 4/off 4/2* |
2. |
0.522 |
0.032 |
| (d) 6/2* 6/4 |
3. |
0.521 |
0.033 |
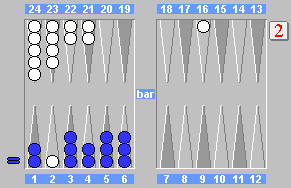
4) 5 point match, Match is even 0:0, Pipcount: Blue 52 / White 59.
Blue to play 3-1?
|
Move |
Rkg. | Equity | Eq. Dif. |
| (a) 3/off 6/5 |
4. |
0.831 |
0.148 |
| (b) 5/2* 3/2 |
1. |
0.979 |
0.000 |
| (c) 3/off 1/off |
3. |
0.854 |
0.125 |
| (d) 5/2* 2/1 |
2. |
0.894 |
0.085 |
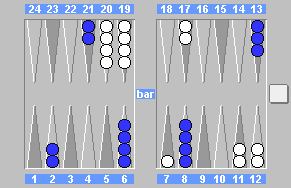
5) 5 point match, Match is even 0:0, Pipcount: Blue 141 / White 132.
Blue to play 3-2?
|
Move |
Rkg. | Equity | Eq. Dif. |
| (a) 8/5 6/4 |
1. |
-0.147 |
0.000 |
| (b) 8/5 8/6 |
4. |
-0.194 |
0.047 |
| (c) 8/3 |
2. |
-0.183 |
0.036 |
| (d) 6/3 6/4 |
3. |
-0.191 |
0.044 |
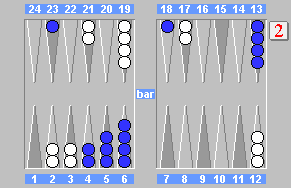
6) 5 point match, Match is even 0:0, Pipcount: Blue 140 / White 177.
Blue to play 5-5?
|
Move |
Rkg. | Equity | Eq. Dif. |
| (a) 23/8 13/8 |
1. |
0.506 |
0.000 |
| (b) 23/18 13/8(3) |
2. |
0.485 |
0.021 |
| (c) 23/18 13/8(2) 6/1 |
4. |
0.422 |
0.084 |
| (d) 18/8 13/8(2) |
3. |
0.453 |
0.053 |
I confess to having blundered on this one myself when it occurred (c). The importance
here is to keep flexibility and not to come in too fast against whites 2-3 back game. Keeping a checker back on
the 18 point is important as it limits whites ability to build up his board with ease. Isn't hindsight a wonderful
thing. ![]()
![]()
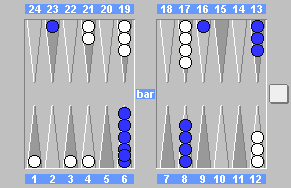
7) 5 point match, Blue is leading 1:0, Pipcount: Blue 146 / White
164.
Blue to play 3-2 ?
|
Move |
Rkg. | Equity | Eq. Dif. |
| (a) 6/3* 3/1* |
3. |
-0.069 |
0.022 |
| (b) 16/11 |
4. |
-0.085 |
0.038 |
| (c) 16/13 8/6 |
2. |
-0.065 |
0.018 |
| (d) 6/4* 4/1* |
1. |
-0.047 |
0.000 |
Surprised me a little this choice, as I was of the opinion that burying a checker
on the 1 point was a bit premature at this stage of the game. I suspect the reason is that blues tactical position
is poor and unstacking the 6 point may well recirculate a checker to be used to greater effect elsewhere. Putting
2 checkers on the bar makes 6s especially double 6s bad for white.
![]()
![]()
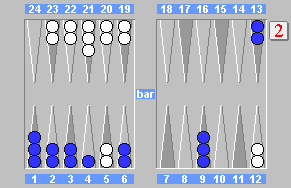
8) 5 point match, Match is even 0:0, Pipcount: Blue 82 / White
110.
Blue to play 6-2?
|
Move |
Rkg. | Equity | Eq. Dif. |
| (a) 9/3 4/2 |
2. |
0.194 |
0.062 |
| (b) 9/1 |
1. |
0.256 |
0.000 |
| (c) 9/3 6/4 |
4. |
-0.128 |
0.384 |
| (d) 13/7 9/7 |
3. |
-0.003 |
0.259 |
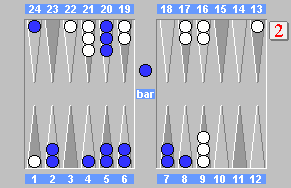
9) 5 point match, Blue is leading 1:0, Pipcount: Blue 161 / White 145.
Blue to play 3-2 from the bar?
|
Move |
Rkg. | Equity | Eq. Dif. |
| (a) 25/22* 22/20 |
3. |
-0.016 |
0.056 |
| (b) 25/22* 24/22 |
4. |
-0.036 |
0.076 |
| (c) 25/22* 20/18 |
1. |
0.040 |
0.000 |
| (d) 25/22* 8/6 |
2. |
0.002 |
0.038 |
10) 5 point match, Blue is leading 3:2, Pipcount: Blue
128 / White 114.
Blue to play 4-2?
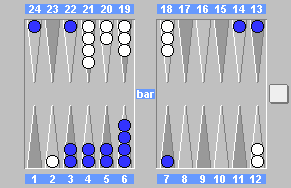
|
Move |
Rkg. | Equity | Eq. Dif. |
| (a) 6/2* 7/5 |
2. |
-0.152 |
0.170 |
| (b) 6/2* 24/22 |
1. |
0.018 |
0.000 |
| (c) 6/2* 13/11 |
3. |
-0.174 |
0.192 |
| (d) 6/2* 6/4 |
4. |
-0.232 |
0.250 |
Disclaimer: Jellyfish can get it wrong.. not often
.. but it can. If you are adamant that Jellyfish has got a position wrong then let me know and I'll check it out.
You might also want to open it up for discussion, this can easily be done by using my Guestbook as a sounding board
or perhaps download
the position(s) and roll them out for yourself (Jellyfish Analyser required).
Should thee fail to sign my Guestbook, then thee shall be
cursed by rolling 5-1 forever more...
BG Home ~ Links ~ Quiz ~ Download ~ Webby's Homepage ~ Credits ~ E-Mail